Adding the Financial Health Widget to Your Site

This “Financial Health Widget” is a quick and easy way to add a floating “Call to Action” on your website that links directly to your Planning Discovery quiz. Start converting your web traffic with the widget


The Financial Health Widget

It floats at the bottom of the user’s screen, like it does on this page. Your widget will automatically adjust to match your firm’s colors, and link directly to your instance of the Financial Health Quiz.


How to Install it

You need to insert your Code Snippet into the "Header" or "Footer" of your page. If you’ve installed Google Analytics, or a Facebook "Pixel," you’ve already done something very similar.
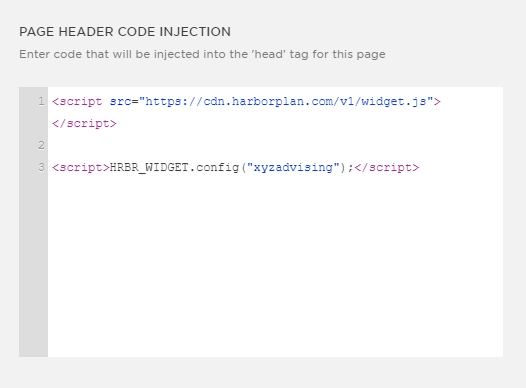
Your Code Snippet

<script src="https://cdn.harborplan.com/v1/widget.js"></script>

<script>HRBR_WIDGET.config("your-instance-name");</script>

Step-by-Step Instructions

  1. Replace "your-instance-name" in the code snippet above with the link to the quiz we provide eg. "xyzadvising"

  2. Navigate to the “Code Insertion” page of your website (see below for links specific instructions for the most common website platforms)

  3. Paste your Code Snippet into the box—it should look something like this.

CodeInjection.PNG

Once you’ve saved the page, that’s it! Your widget is live.


Still Not Sure How to Insert Scripts?

If you have a professional managing your website

  • Ask them to do this for you--it's a routine operation that should take 30 seconds

If you use a DIY website platform

Click below for platform-specific instructions for how to insert scripts:

Either header or footer inject will work fine.

If you aren't sure how to proceed, or your platform is not listed

Get in touch with support!


Getting Started Guide

For Harbor’s Prospecting Assistant

growth3.jpg
 

Log In and Link your E-mail Account

To get started with Harbor, you’ll need to log into the dashboard, and link up your E-mail Account


Step 1: Login to the Advisor Dashboard

Advisor Dashboard Login Screen

Advisor Dashboard Login Screen

  • This Dashboard is where you will return to invite new prospects, review Health Quiz results, and approve new campaigns.

Advisor Dashboard

Advisor Dashboard


Step 2: Link Your E-mail Account

In order to use Harbor’s e-mail functionality (auto-detecting new inbound leads, sending nurture campaigns), you will need to link your e-mail account.

E-mail Link Using IMAP Settings

E-mail Link Using IMAP Settings

  • Click the “Link Your Email Now” button on the Dashboard

  • If your email provider is Gmail or Microsoft Exchange, you will be able to use your regular e-mail login credentials to sign in.

  • Otherwise, you will need to provide IMAP/SMTP settings (Guide: How to Find your IMAP settings)

If you encounter difficulties contact support at info@harborplan.com


Review Prebuilt Campaigns

Once you link your email account, you’ll have full access to Harbor’s library of compliance-approved content campaigns for nurturing, and converting your prospects.


Step 1. Review Campaigns Available to You

Click here to review all the available campaigns and templates. Click on any campaign to review the messages inside of them.

Campaigns are grouped according to the “Lifecycle Stage” of the prospect

  • Direct Invitation - Nurture prospects whose information you have collected from other sources (Workshops, Mailing Lists etc…)

  • Referral Leads - Contact brand new prospects that are sent to you from from sources eg. SmartVestor, SmartAdvisor etc…

  • Pre-Quiz Completion - Long-term nurture campaign

  • Post-Quiz Completion - Convert clients who have completed the Health Quiz but not yet scheduled a consultation.

Overview of Available Campaigns (Link to View)

Overview of Available Campaigns (Link to View)


Step 2. Reviewing/Editing Individual Messages

IMPORTANT NOTICE: Before sending a campaign to any potential client, you should review all message templates in that campaign to ensure they are suitable for your audience.

  • Every campaign contains one or more messages.

  • Click “Edit Template” to review any individual message and make edits as necessary.

  • The “Header” and “Footer/Signature” block of e-mails are shared across all your templates. To change these, you need to edit them separately (Link to Edit Header| Link to Edit Header)

Individual Campaign Step

Individual Campaign Step

Email Message Editor

Email Message Editor


Step 3. Adding/Removing/Re-Ordering Messages

In addition to editing messages, you can change the structure of the campaign by adding, removing, or re-ordering messages:

  1. Add New Messages - You can add both Email and Text messages

  2. Remove a Message - Messages cannot be restored once removed

  3. Re-Order Messages - Move a message to another position

  4. Set a Follow-Up Campaign - Automatically enroll user in another campaign once current campaign runs out of messages

Summary View for an Individual Campaign

Summary View for an Individual Campaign


Step 4. Send Out a Test Invitation

Once you’re happy with your campaigns, go ahead and test it out by an invitation campaign to yourself:

  1. Access the Invite Prospect page by clicking on “Invite” on the dashboad (click here to go directly)

  2. Input Prospect Details - Add as many prospects as you like. Only email is mandatory, but if you don’t include First Name or Phone Number, certain features may not work properly

  3. Select the Campaign - When inviting new prospects using this menu, only “Direct Invitation” campaigns are be available.

  4. Personalize Message - You can personalize the message before sending it out, but these changes will only apply to the current recipients.

Invite Prospect Details Page

Invite Prospect Details Page

Campaign Selection Menu

Campaign Selection Menu


Automated Follow-Up that will Wait for You to Call

Do you prefer to call leads before sending them e-mail follow-ups? By using the automated delay feature, you can do that without having to remember manually approve each lead after you’ve tried to call them first.

The Assistant will wait for you to call a paid leads first, and if you successfully contact the lead on the phone, all automated follow up is paused. Only if you aren’t able to get through, it will automatically start the follow-up campaign.

Watch the video to learn more!


Want to learn more about Harbor’s tools to automate how you handle leads from WiserAdvisor, SmartVestor, ELP or even your own website?